How I built a cross-compilation workflow for the Raspberry Pi
Some of you may know I tinker with the Raspberry Pi in my free time and that one of my current projects is to build a lensless microscope with the Pi as the brains. To control the microscope, I decided a while ago that I would use Micro-Manager, an open-source software package for microscope control. I made this decision for a few reasons:
- I already knew the Micro-Manager codebase since I use it frequently at work.
- The Micro-Manager core provides a device-independent interface to hardware.
- I've contributed to the project in the past and feel a sense of loyalty to the project and the people involved. Expanding Micro-Manager into embedded microscopy would be a great way for me to give back to the community.
Building Micro-Manager from source code presents its own set of challenges. After ensuring that you have the correct build environment, you need to actually compile it, and here's where things get tricky in Raspyberry Pi development. The Pi has an ARM processor, whereas most laptops and workstations use a x86_64 processor. This means that code compiled on a typical desktop PC will not work on the Pi. As I showed in my earlier post, you can compile the code directly on the Pi to circumvent this, but this unfortunately is quite cumbersome because the code base and dependencies are quite large. (They are nearly 8 GB in total). Furthermore, compiling the project on the Pi is slow and requires connecting to it via ssh or working directly on a TV screen or monitor.
These problems extend beyond Micro-Manager to other large-scale projects that require code compilation for a specific processor architecture. In this post, I'll describe the workflow that I developed for cross-compiling projects for the Raspberry Pi.
Previous attempts
Prior to the workflow that is the main topic of this post, I managed to cross-compile Micro-Manager using a chroot environment and the QEMU emulator. chroot is a Linux command that changes the apparent root (or '/') directory for a running process. With this approach, I mount an image of the Raspbian operating system that contains the gcc and g++ compilers and libraries for the ARM architecture. Then, I chroot into the image and run a setup script that builds the software. During execution of this script, the QEMU static libraries run the ARM compilers from within the chroot environment to build the project. The compiled code remains inside the image, which I then burn onto a micro SD card to insert into the Pi. I uploaded a gist of the bash script which orchestrates all this, and my inspiration for this approach came from a great series of blog posts from Disconnected Systems.
Ultimately this approach is a huge amount of work. As you can see in the gist, it's fairly complicated bash scripting that's not easy to debug. Furthermore, the setup script that is run inside the image needs to do a lot of work beyond cross-compiling, like setting up the user, permissions, network, etc. Debugging the final product is also a challenge because you need to verify that it's working on the Pi, which requires burning the image to a micro SD card.
Cross-compiling with Docker
After a bit of research I decided I would try instead to use Docker for cross-compilation and deployment to the Pi. I had just started using Docker at work to build reproducible environments for scientific computing research. In particular, and unlike my chroot script, I had learned that a Docker container that built the project could work on nearly any system that had Docker installed. Furthermore, deploying updates can be done on any Raspberry Pi that's running Docker.
I liked the idea of a portable cross-compilation workflow, so I dove into the Docker documentation and managed to get everything working in a few weeks of tinkering at home.
An overview of Docker
You can find many resources online about Docker, so I won't go into the details here. The main thing you need to know is that Docker is a system for creating, running, and sharing containers, which are something like light weight virtual machines. Containers solve the problem in software development of how to build and deploy programs that have a complex set of dependencies. It does this by isolating the environment in which a program runs from the rest of the operating system. For example, if you have a computer that has a certain version of gcc (the GNU C compiler) installed, but your application requires a different version, then you can install the required gcc along with your application inside a container and they will not interfere with the version of gcc that belongs to your operating system. This also means that you can send your container to any machine that has Docker installed and it should just run without having to do any setup.
Other important things to know about Docker are:
- There are two main types of objects: images and containers. Images are sort of like blueprints that define what is inside a container, whereas containers are like the actual buildings specified by the blueprints. There can be many containers that come from a single image.
- Containers are meant to be immutable. When you stop them and restart them, they always restart in the same state as when they were first created.
- Since containers are immutable, some of your application data may need to be placed in a volume, which is either another container or a folder on the host system. A volume gets connected to your application container and exists even when your application container is not running.
The cross-compilation workflow
Now that we have established the essential background to this project, let's look at the cross-compilation workflow. Below is a picture that provides a sense of the entire process, moving in general from left-to-right.
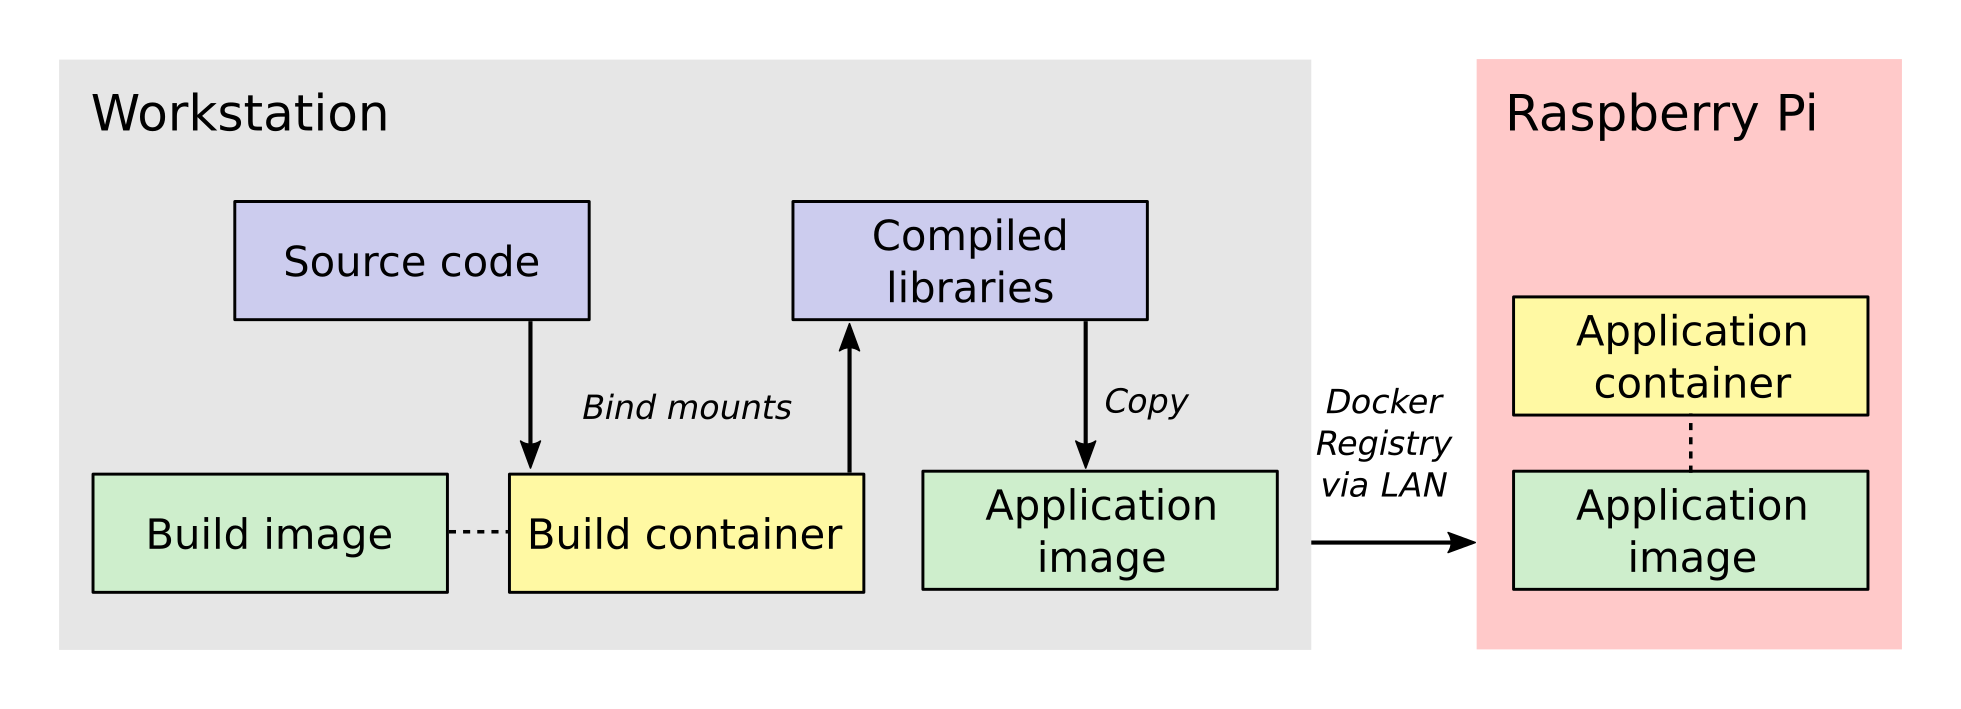
The process involves two Docker containers: one for building Micro-Manager and the other for running the application. The build dependencies and the QEMU emulator are both located inside the build container, having been specified when its image was created. These allow us to compile Micro-Manager for the ARM architecture. The source code is connected to the build container as a bind mount, which is a folder from the host workstation that is mounted inside the build container when it is run.
Once the libraries are compiled, they are installed into a folder inside the bind mount so that the host system will have access to them after the build container closes. Next, the compiled libraries are copied directly into an image that defines the application container. This image defines only the essential run-time requirements for running Micro-Manager and nothing else. The application image is stored on the registry server which I set up on my local network. This makes it easy for the Raspberry Pi to download the latest image and run the Micro-Manager application container whenever I make changes.
An important aspect of this workflow is how the data is passed between the systems and containers. Unlike what you will find in many introductory tutorials on Docker, I do not add the Micro-Manager source code directly to the build image/containers but instead use a bind mount. The reason for this is that the source code and 3rd party libraries are quite large, about 8 GB in total. By using a bind mount, I avoid needless copying of this data. Another reason for using a bind mount is that the source code will change frequently during development. If I add the source code to the image, then I will have to recreate the image every time the source code changes.
Once the libraries are built, I directly copy them into the application image because they are much, much smaller than the source code. I also want the code stored directly in the image so that the application image is all the Raspberry Pi needs to run the program. The image is stored in my local Docker registry server so that once I push an updated image to the server, the Raspberry Pi can download it and use it immediately.
Step 0: Prerequisites
I am going to assume that you already have installed Docker. (If not, follow these directions.) I am also going to assume that you are somewhat familiar with how to work on a Linux system. The Raspberry Pi runs Linux, so you probably wouldn't be here if you didn't already know at least a little.
For this article, I am working with these versions of Docker and Ubuntu on my host workstation.:
kmdouglass@xxxxx:~$ uname -a
Linux xxxxx 4.13.0-39-generic #44~16.04.1-Ubuntu SMP Thu Apr 5 16:43:10 UTC 2018 x86_64 x86_64
x86_64 GNU/Linux

kmdouglass@xxxxx:~$ docker version
Client:
 Version:      18.03.1-ce
 API version:  1.37
 Go version:   go1.9.5
 Git commit:   9ee9f40
 Built:        Thu Apr 26 07:17:20 2018
 OS/Arch:      linux/amd64
 Experimental: false
 Orchestrator: swarm

Server:
 Engine:
  Version:      18.03.1-ce
  API version:  1.37 (minimum version 1.12)
  Go version:   go1.9.5
  Git commit:   9ee9f40
  Built:        Thu Apr 26 07:15:30 2018
  OS/Arch:      linux/amd64
  Experimental: false
Finally, below is how my project directory structure is laid out.:
kmdouglass@xxxxx:~/src/alphapi/docker$ tree -L 2
.
└── rpi-micromanager
    ├── 2.0-python
    │   ├── build
    │   └── Dockerfile
    └── build
        ├── build
        ├── Dockerfile
        ├── run
        └── setup
I have two folders; build, which contains the files for the build container, and 2.0-python, which contains the files for creating the Micro-Manager application container. (In my case, I am going to build the Python wrapper for Micro-Manager 2.0.) Inside each folder are the scripts and Dockerfiles that execute the various steps of the workflow.
The final prerequisite is to register QEMU with the Docker build agent. First, install a few packages for QEMU. On Ubuntu, this looks like
$ sudo apt update
$ sudo install qemu qemu-user-static qemu-user binfmt-support
Finally, register the build agent with the command:
$ docker run --rm --privileged multiarch/qemu-user-static:register --reset
Step 1: Create the build image
Inside the build folder, I have a file called Dockerfile. Here are its contents.
# Copyright (C) 2018 Kyle M. Douglass
#
# Defines a build environment for Micro-Manager on the Raspberry Pi.
#
# Usage: docker build \
#          -t NAME:TAG \
#         .
#

FROM resin/raspberrypi3-debian:stretch
MAINTAINER Kyle M. Douglass <kyle.m.douglass@gmail.com>

RUN [ "cross-build-start" ]

# Get the build dependencies.
RUN apt-get update && apt-get -y install --no-install-recommends \
autoconf \
automake \
build-essential \
git \
libatlas-base-dev \
libboost-dev \
libboost-all-dev \
libtool \
patch \
pkg-config \
python3-dev \
python3-pip \
python3-setuptools \
python3-wheel \
swig \
&& apt-get clean && rm -rf /var/lib/apt/lists/* \
&& pip3 install numpy

RUN [ "cross-build-end" ]

# Set up the mount point for the source files and setup script.
ADD setup /micro-manager/
VOLUME /micro-manager/src

WORKDIR /micro-manager/src
ENTRYPOINT [ "/sbin/tini", "-s", "--" ]
CMD [ "/micro-manager/setup" ]
A Dockerfile defines the steps in building an image -- in this case, the build image. Let's break this file down into pieces. In the first two lines that follow the comments, I specify that my image is based on the resin/raspberrypi3-debian:stretch image and that I am the maintainer.
FROM resin/raspberrypi3-debian:stretch
MAINTAINER Kyle M. Douglass <kyle.m.douglass@gmail.com>
Images from Resin are freely available and already have the QEMU emulator installed. Next, I specify what commands should be run for the ARM architecture. Any commands located between RUN [ "cross-build-start" ] and RUN [ "cross-build-end" ] will be run using the emulator. Inside these two commands, I install the build dependencies for Micro-Manager using apt-get and pip. (These are just standard commands for installing software on Debian/Ubuntu Linux machines and from PyPI, respectively.)
After the installation of the requirements completes, I add the setup script to the folder /micro-manager inside the image with the ADD setup /micro-manager/ command. The setup script contains the commands that will actually compile Micro-Manager. I then define a mount point for the source code with VOLUME /micro-manager/src. It's important to realize here that you do not mount volumes inside images, you mount volumes inside containers. This command is just telling the image to expect a folder to be mounted at this location when the container is run.
The last three lines set the working directory, the entrypoint and the default container command, respectively.
WORKDIR /micro-manager/src
ENTRYPOINT [ "/sbin/tini", "-s", "--" ]
CMD [ "/micro-manager/setup" ]
This specific entrypoint tells Docker that any containers built from this image should first run Tini, which is a lightweight init system for Docker containers. If you do not specify Tini as the entry point, then it will not be able to reap zombies. (I don't know what this means exactly, but it sounds cool and you can read about it here: https://github.com/krallin/tini)
By default, the container will run the setup script, but, since I used the CMD directive, this can be overriden in case we need to perform some manual steps. Roughly speaking, you can think of the entrypoint as the command that can not be overridden and the CMD command as the one that can be. In other words, Tini will always be executed when containers created from this image are launched, whereas you can choose not to run the setup script but instead to enter the container through a Bash shell, for example.
To build the image, I use the following build script located in the same directory as the Dockerfile for convenience.
#!/bin/bash
# Copyright (C) 2018 Kyle M. Douglass
#
# Usage: ./build
#

docker build \
       -t localhost:5000/rpi-micromanager:build \
       .
By using -t localhost:5000/rpi-micromanager:build argument I am giving the image a name of rpi-micromanager, a tag of build, and specifying that I will eventually host this image on my local registry server (localhost) on port 5000.
In case you are wondering about the contents of the setup script, don't worry. I'll explain it in the next section.
Step 2: Compile Micro-Manager
After the image is built, I create a container and use it to compile Micro-Manager. For this, I use the run script in the build directory.
#!/bin/bash
# Copyright (C) 2018 Kyle M. Douglass
#
# Usage: ./run DIR CONFIGURE
#
# DIR is the parent folder containing the micro-manager Git
# repository, the 3rdpartypublic Subversion repository, and any
# additional build resources.
#
# If CONFIGURE=true, the build system is remade and the configure
# script is rerun before running 'make' and 'make install'. If
# CONFIGURE=false, only 'make' and 'make install' are run.
#
# The compiled program files are stored in a bind mount volume so that
# they may be copied into the deployment container.
#

src_dir=$1
cmd="/micro-manager/setup $2"

# Remove the build artifacts from previous builds.
if [ "$2" == true ] || [ "$2" == false ]; then
    rm -rf ${src_dir}/build || true
fi

docker run --rm \
       -v ${src_dir}:/micro-manager/src \
       --name mm-build \
       localhost:5000/rpi-micromanager:build \
       ${cmd}
The script takes two arguments. The first is the path to the folder containing all the source code (see below for details). The second argument is either true or false. (It can actually be anything, but it will only compile Micro-Manager if either true or false are provided.) If true, the full build process is run, including setting up the configure script; if false, only make and make install are run, which should recompile and install only recently updated files.
The run script uses the -v argument to docker run to mount the source directory into the container at the point specified by the VOLUME command in the Dockerfile. The directory layout on my host file system for the source directory looks like this:
kmdouglass@xxxxx:/media/kmdouglass/Data/micro-manager$ tree -L 1
.
├── 3rdpartypublic
├── micro-manager
└── patches
The patches folder is not necessary and only there to fix a bug in the WieneckeSinscke device adapter. (This bug may be fixed by now.) 3rdpartypublic is the large Subversion repository of all the required software to build Micro-Manager, and micro-manager is the cloned GitHub repository. Prior to building, I checkout the mm2 branch because I am interested in developing my application for Micro-Manager 2.0.
The setup script that is run inside the container and mentioned in the previous section looks like this.
#!/bin/bash
#
# # Copyright (C) 2018 Kyle M. Douglass
#
# Builds Micro-Manager.
#
# Usage: ./setup CONFIGURE
#
# If CONFIGURE=true, the build system is remade and the configure
# script is rerun before running 'make' and 'make install'. If
# CONFIGURE=false, only 'make' and 'make install' or run.
#
# Kyle M. Douglass, 2018
#

# Move into the source directory.
cd micro-manager

# Undo any previous patches.
git checkout -- DeviceAdapters/WieneckeSinske/CAN29.cpp
git checkout -- DeviceAdapters/WieneckeSinske/WieneckeSinske.cpp

# Patch the broken WieneckeSinske device adapter.
patch DeviceAdapters/WieneckeSinske/CAN29.cpp < ../patches/CAN29.cpp.diff \
&& patch DeviceAdapters/WieneckeSinske/WieneckeSinske.cpp < ../patches/WieneckeSinske.cpp.diff

# Compile MM2.
if [ "$1" = true ]; then
    # Remake the entire build system, then compile from scratch.
    ./autogen.sh
    PYTHON="/usr/bin/python3" ./configure \
        --prefix="/micro-manager/src/build" \
        --with-python="/usr/include/python3.5" \
        --with-boost-libdir="/usr/lib/arm-linux-gnueabihf" \
        --with-boost="/usr/include/boost" \
        --disable-java-app \
        --disable-install-dependency-jars \
        --with-java="no"
    make
    make install
    chmod -R a+w /micro-manager/src/build
elif [ "$1" = false ]; then
    # Only recompile changed source files.
    make
    make install
    chmod -R a+w /micro-manager/src/build
else
    echo "$1 : Unrecognized argument."
    echo "Pass \"true\" to run the full build process."
    echo "Pass \"false\" to run only \"make\" and \"make install\"."
fi
Most important in this script is the call to configure. You can see that the compiled libraries and Python wrapper will be written to the build folder inside the mounted directory. This gives the host file system access to the compiled artifacts after the container has stopped.
Step 3: Build the application image
Once the libraries are compiled, we can add them to an application image that contains only the essentials for running Micro-Manager.
For this, I use a separate Dockerfile inside the 2.0-python directory.
# Copyright (C) 2018 Kyle M. Douglass
#
# Builds the Micro-Manager 2.0 Python wrapper for the Raspberry Pi.
#
# Usage: docker build \
#          -t NAME:TAG \
#          .
#

FROM resin/raspberrypi3-debian:stretch
MAINTAINER Kyle M. Douglass <kyle.m.douglass@gmail.com>

RUN [ "cross-build-start" ]

# Install the run-time dependencies.
RUN apt-get update && apt-get -y install --no-install-recommends \
    libatlas-base-dev \
    libboost-all-dev \
    python3-pip \
    python3-setuptools \
    python3-wheel \
    && pip3 install numpy \
    && apt-get clean && rm -rf /var/lib/apt/lists/*

# Copy in the Micro-Manager source files.
RUN useradd -ms /bin/bash micro-manager
WORKDIR /home/micro-manager/app
COPY --chown=micro-manager:micro-manager . .

RUN [ "cross-build-end" ]

# Final environment configuration.
USER micro-manager:micro-manager
ENV PYTHONPATH /home/micro-manager/app/lib/micro-manager
ENTRYPOINT ["/sbin/tini", "-s", "--"]
CMD ["/usr/bin/python3"]
As before, I use a clean resin base image. However, this time I only install the essential software to run Micro-Manager.
After apt-getting and pip-installing everything, I create a new user called micro-manager and a new folder called app inside this user's home directory.
# Copy in the Micro-Manager source files.
RUN useradd -ms /bin/bash micro-manager
WORKDIR /home/micro-manager/app
Next, I directly copy the compiled libraries into the image with the COPY command.
COPY --chown=micro-manager:micro-manager . .
The two periods (.) mean that I copy the current host directory's contents into the container's current working directory (/home/micro-manager/app). What is the current host directory? Well, as I explain below, I actually run this Dockerfile from inside the build folder that was created to hold the compiled libraries in the previous step. But first, I'll end my explanation of the Dockerfile by saying that I switch the USER so that I do not run the container as root, add the library to the PYTHONPATH environment variable, and setup the default command as the python3 interpreter.
To build this image, I use the following build script.
#!/bin/bash
# Copyright (C) 2018 Kyle M. Douglass
#
# Usage: ./build DIR
#
# DIR is the root directory containing the Micro-Manager build
# artifacts. These artifacts will be added to the Docker image.
#

src_dir=$1

cp Dockerfile ${src_dir}
cd ${src_dir}

docker build \
       -t localhost:5000/rpi-micromanager:2.0-python \
       .
This script takes one argument, which is the build directory containing the compiled source code. The script first copies the Dockerfile into this directory and then changes into it with the cd command. (This explains the two periods (.) in the COPY command in the Dockerfile.)
Finally, I build the image and give it a name of localhost:5000/rpi-micromanager:2.0-python.
Step 4: Add the image to the local registry server
Now we need a way to get the image from the workstation onto the Raspberry Pi. Of course, I could manually transfer the file with a USB stick or possibly use ssh, but what if I have multiple Pi's? This process could become cumbersome. Docker provides a few ways to push and pull images across a network. The most obvious is Dockerhub, a site for freely sharing images. For the moment I don't want to use Dockerhub, though, because I have not yet checked all the software licenses and am unsure as to what my rights are for putting an image with Micro-Manager software on a public repository.
A better option, especially for testing, is to use a local registry server. This server operates only on my home network and already allows my workstation and Pi's to communicate with one another. Following the official registry documentation and this blog post by Zachary Keeton, I managed to setup the registry as follows.
Host setup
First, we need to setup a transport layer security (TLS) certificate. It's possible to run the server without one if you don't expect your network to be attacked, but it's good practice so let's create one.
To do this, I edit the /etc/ssl/openssl.cnf file and add the following to the top of the [ v3_ca ] section.:
subjectAltName = IP:192.168.XXX.XXX
where the IP address is the address of the workstation on the network. Next, I actually create the certificate. I make a directory called certs inside my workstation home directory and then use openssl to make the cerficate. During the prompts, I press ENTER at every step except the FQDN (fully qualified domain name). For the FQDN, I enter the same IP address as above.
mkdir certs
openssl req -newkey rsa:4096 -nodes -sha256 \
-keyout certs/domain.key -x509 -days 365 \
-config /etc/ssl/openssl.cnf -out certs/domain.crt
I had to add the ``-config /etc/ssl/openssl.cnf`` argument for the subject alternative name to be added to the certificate. This part was tricky, because if this argument is not included, then the key generation step will use some other .cnf file (I am not sure which). This results in the following SAN error when attemptingt to connect to the registry.:
cannot validate certificate for 192.168.XXX.XXX because it doesn't contain any IP SANs
After the domain.key and domain.crt files have been created, I run the official registry server container. (See how handy Docker containers are? There's no messy installation beyond grabbing the container.)
docker run -d -p 5000:5000 \
  --restart=always \
  --name registry \
  -v $(pwd)/certs:/certs \
  -e REGISTRY_HTTP_TLS_CERTIFICATE=/certs/domain.crt \
  -e REGISTRY_HTTP_TLS_KEY=/certs/domain.key \
  registry:2
If the registry:2 image is not already downloaded, then it will be downloaded for automatically when running the container. Note that the -p 5000:5000 argument indicates that the server is using port 5000 on both the host system and inside the container. Note also that the certs directory is relative to the current directory because I use the ($pwd) command. You can change this to an absolute path if you wish on your setup.
Let's go ahead and push the application image to the server now that it's running.
docker push localhost:5000/rpi-micromanager:2.0-python
Setup the Pi
Now, startup the Pi. I will assume that you have already installed Docker on it and know how to communicate with it via ssh and copy files to it using scp.
I copy the certificate from the host with scp.
sudo mkdir -p /etc/docker/certs.d/192.168.XXX.XXX:5000/
sudo scp kmdouglass@192.168.XXX.XXX:/home/kmdouglass/certs/domain.crt /etc/docker/certs.d/192.168.XXX.XXX:5000/ca.crt
The IP address that I am using is the one to the machine where the registry server is running. After this step, I make the operating system trust the certificate.
sudo scp kmdouglass@192.168.XXX.XXX:/home/kmdouglass/certs/domain.crt /usr/local/share/ca-certificates/192.168.XXX.XXX.crt
sudo update-ca-certifications
Finally, I restart the Docker daemon.
sudo service docker restart
If everything is working, then I should be able to pull the image from your network's registry server.
docker pull 192.168.XXX.XXX:5000/rpi-micromanager:python2.0
Step 5: Run Micro-Manager!
And now the moment of truth: running the application container. Since it's setup to run Python automatically, I use a pretty simple docker run command.
docker run -it --rm \
     --name micro-manager \
     192.168.XXX.XXX:5000/rpi-micromanager:2.0-python
I verify that the Micro-Manager Python wrapper is working by trying to import it and run a few basic commands.
>>> import MMCorePy
>>> mmc = MMCorePy.CMMCore()
>>> mmc.getVersionInfo()
If these work without error, then congratulations! You're now ready to start building your embedded microscopy system ;)
Step 6: Running the whole process
The beauty of having scripted all these steps is that the full workflow may be executed quite simply. From the host system's build folder, run:
kmdouglass@xxxxx:~/src/alphapi/docker/rpi-micromanager/build$ ./build
kmdouglass@xxxxx:~/src/alphapi/docker/rpi-micromanager/build$ ./run /path/to/source true
From the 2.0-python folder:
kmdouglass@xxxxx:~/src/alphapi/docker/rpi-micromanager/2.0-python ./build /path/to/source/artifacts
kmdouglass@xxxxx:~$ docker push localhost:5000/rpi-micromanager:2.0-python
And from the Raspberry Pi:
pi@yyyyy:~$ docker pull 192.168.XXX.XXX:5000/rpi-micromanager:2.0-python
pi@yyyyy:~$ docker run -it --rm \
                   --name micro-manager \
                   192.168.XXX.XXX:5000/rpi-micromanager:2.0-python
Hopefully this is enough to get you started building Micro-Manager for the Raspberry Pi with Docker. Though I focused on Micro-Manager, the workflow should be generally applicable to any large scale project in which you want to isolate the build environment from the host machine.
If you have any questions, just leave them in the comments. Happy programming!
Comments
Comments powered by Disqus